|
 |
GoldenEye 007 Nintendo 64 Community, GoldenEye X, Nintendo 64 Games Discussion
GoldenEye Cheats, GoldenEye X Codes, Tips, Help, Nintendo 64 Gaming Community
|
|
|
|
|
|
|
|
|
|
|
SATURN_81
00 Agent

Joined: 06 Jun 2010
Posts: 423
Location: spain
|
 Posted: Sun May 13, 2012 3:12 pm Post subject: Posted: Sun May 13, 2012 3:12 pm Post subject: |
  |
|
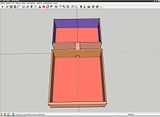
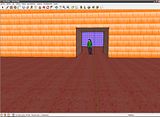
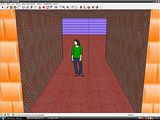
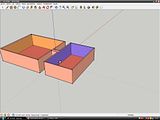
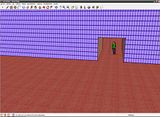
Shogun hello after almost a week. well I already started to build some 2 bedrooms joined by a corridor which I hope you understand your steps in the initiation and anyway I keep trying to join 2 rooms in several different ways to see which is the best method to do this. shipping passing some pictures so you can correct me. I am using the free version SketchUp to do all I am with a OBJ plugin I found. use of time this program is the only Spanish-language and easy learning. I understand that this program still does not think it was used earlier to make a level GE, but I have to say right now is the easiest for me because I have no idea about 3D modeling. on the dimensions of level of Goldeneye is not nothing, is not whether they are in meters, centimeters or millimeters. perhaps to the editor out of this size or proportion. if you are missing the traditionally files are sent to tell me how that is the first time I send something to the forum. thank you all for supporting me.
hola Sogun despues casi de una semana. bueno yo empece ya un poco a construir 2 habitaciones unidas por un pasillo con lo cual espero haber entendido tus pasos en la iniciacion y de todas formas voy seguir intentando unir 2 habitaciones de varias formas diferentes para comprobar cual es el mejor metodo para hacer esto. de paso envio unas imagenes para que puedas corregirme. estoy usando el Sketchup version gratuita para poder hacer todo estoy con un plugin de OBJ que encontre. utilizo de momento este programa por que es el unico en español y con facil aprendizaje. entiendo que todavia este programa no creo que haya sido usado antes para hacer un nivel GE,pero tengo que decir que ahora mismo es el mas facil para mi debido a que no tengo ni idea sobre modelado 3D. sobre las dimensiones de nivel de Goldeneye no se nada, es decir no se si son en metros , centimetros o milimetros. quizas para el editor se salga de sus dimensiones o este desproporcionados. si le hacen falta los achivos dime como se envian por que es la primera vez que envio algo al foro. gracias a todos por apoyarme.
[img]miNivel1
[img]miNivel2
[img]miNivel3
[img]miNivel4
[img]minivel5 |
|
| |
|
|
|
|
|
|
|
|
Sogun
General


Joined: 15 Dec 2010
Posts: 661
Location: Valencia, Spain
|
| Posted: Mon May 14, 2012 3:36 am Post subject: |
|
|
Hola SATURN_81
Lo de las dimensiones te lo decÃa para que luego en el editor de GE no tuvieras que reescalar el mapa para poder probarlo. No es un proceso complicado y hay varias formas de hacerlo, pero siempre es mejor hacerlo bien a la primera.
Normalmente los programas de modelado indican las dimensiones en unidades, asà que si quieres hacer una habitación de 3x3 metros deberÃas de modelarla con 300x300 unidades.
Para compartir archivos yo uso mediafire. Es gratuito y sólo necesitas dar una dirección de correo para crearte una cuenta. Tienes hasta 200 MB de capacidad para subir tus archivos. Cuando subes un archivo a mediafire se te crea un link de descarga que es lo que debes copiar y publicar en el foro para que podamos descargar el archivo.
No se ven tus imágenes.
-------------------------------------------
IN ENGLISH
I told you about dimensions so you won't have to reescale your level in the GE Editor before you try it ingame. It's not complicated and there are many ways to reescale it, but it's always better to make things right from the start.
Usually modellers tell dimensions in units, so if your are doing a 3x3 meters room you should make it 300x300 units.
I use mediafire for sharing my files. It's free and it only requires an email to create an account. You can store up to 200 MB. When you upload a file mediafire creates a link which you have to copy and post it in the forums so we can download your file.
I can't see your images. |
|
| |
|
|
|
|
|
|
|
|
SATURN_81
00 Agent
Joined: 06 Jun 2010
Posts: 423
Location: spain
|
| Posted: Mon May 14, 2012 4:41 am Post subject: |
|
|
sketchup has several templates to choose from, millimeters meters and inches, millimeters I use this time. good to start with this program you get a doll of a person and is what you use as reference. pictures of what I hope will not make that mistake more, but I think it can be hung directly on the forum, I realized this quite late, I think we should put a link to the photo, I'll have to find a place them and then to put that link in the next post.
sketchup tiene varias plantillas para elegir , milimetros metros y pulgadas, yo utilice milimetros esta vez . bueno al empezar con este programa te ponen un muñeco de una persona y es lo que utilice como referencia. sobre lo de las imagenes espero no cometer mas ese error , pero creo que no se pueden colgar directamente en el foro, de esto me di cuenta bastante tarde , creo que hay que poner un vinculo con la foto , me tendre que buscar un sitio donde ponerlas y luego poder poner ese vinculo en el proximo post. |
|
| |
|
|
|
|
|
|
|
|
Sogun
General
Joined: 15 Dec 2010
Posts: 661
Location: Valencia, Spain
|
| Posted: Mon May 14, 2012 6:03 am Post subject: |
|
|
I use Photobucket to upload my images. You only need an email account to register and ist's free. I don't know its limitations but I've uploaded +300 images, many of them png (which are bigger than jpg) and never had any problems. The only issue I've found is that images bigger than 1024x1024 pixels are resized down.
--------------------------------------------------------
Yo uso Photobucket para poner mis imágenes. Sólo necesitas una cuenta de correo para registrarte y es gratuito. No sé qué lÃmites tiene pero he subido más de 300 imágenes, muchas de ellas en formato png (que ocupan más que en jpg) y no he tenido nunca ningún problema. El único pero que le he encontrado es que las imágenes de más de 1024x1024 pÃxeles te las reduce. |
|
| |
|
|
|
|
|
|
|
|
SATURN_81
00 Agent
Joined: 06 Jun 2010
Posts: 423
Location: spain
|
| Posted: Mon May 14, 2012 6:21 am Post subject: |
|
|
good record in photobucket and I will try and send the images continucaion I said Shogun.
bueno ya me registre en photobucket y continucaion intentare enviar las imagenes que le dije sogun.
 |
|
| |
|
|
|
|
|
|
|
|
Sogun
General
Joined: 15 Dec 2010
Posts: 661
Location: Valencia, Spain
|
| Posted: Mon May 14, 2012 3:16 pm Post subject: |
|
|
Heh, the pics are tiny. It looks good, I think Scketchup triangulates the model automatically when you export it to OBJ. Be sure to group the polys as I told you before (Room01, Room02 and Room03) before you create the OBJ file or it won't export on Editor.
Next thing you need to do is modeling the clipping. If you were doing the level for PD you could use this model and it will work, but for GE you need to be sure it's perfectly triangulated (again, see the pic I uploaded some messages before).
The only thing left are textures. As this is a test you don't have to worry about the looks and you can use GE original textures (even random textures would work) and to do so you don't even have to use the GE textures on your Scketchup model.
So I say you are ready to create the Background.OBJ and the Clipping.OBJ files for a PD level.
-Then put all the OBJ, MTL and image files for your textures in the same folder.
-Save the image files as BMP (using Paint). This is probably not needed.
-Open the MTL files (with Notepad) and change the image extensions for your textures to BMP. Again, I'm not sure if this has to be done, but just in case.
-Create the textures.TXT and write the following (left colum is the GE/PD original texture ID and right colum is the texture you have used in Scketchup)
for GoldenEye
| Code: | 02B8 floortexture.bmp (the real name of the texture you used for the floor)
011F walltexture1.bmp (the real name of the texture you used for walls in one room)
011A walltexture2 (the real name of the texture you used for walls in the other room)
00A1 walltexture3 (the real name of the texture you used for the corridor)
0277 ceilingtexture.bmp (the real name of the texture you used for ceilings) |
for PD
| Code: | 02B8 floortexture.bmp (the real name of the texture you used for the floor)
017D walltexture1.bmp (the real name of the texture you used for walls in one room)
024C walltexture2.bmp (the real name of the texture you used for walls in the other room)
0288 walltexture3.bmp (the real name of the texture you used for the corridor)
018D ceilingtexture.bmp (the real name of the texture you used for ceilings) |
This textures are some I've selected right now, but you can use any others for the textures.TXT or change them later in Editor.
As for clipping, you can actually import a map to Editor without it but you'll have to do it if you want to play the level. It can be done modeling it with Scketchup or directly on Editor (it's easy but takes time, especially it the level is big).
Now you are ready to port the files to Editor. Check one of my previous comments to know how to do it.
-----------------------------------------------------------------------
Las imágenes son enanas XD. Parece que todo está bien, creo que Scketchup triangula el modelo cuando exporta a OBJ automáticamente. Asegúrate de agrupar los polÃgonos en Room01, Room02 y Room03 antes de crear el archivo OBJ o no funcionará en el Editor.
Lo próximo que debes hacer es modelar el clipping. Si estuvieses haciendo en mapa para PD podrÃas usar este mismo modelo, pero para GE sólo necesitas el suelo y que esté perfectamente triangulado (mira la imagen que puse en uno de mis mensajes anteriores).
En realidad no necesitas el clipping para importar el mapa al Editor, pero sà que es necesario para que sea jugable. Puedes añadirlo más tarde modelándolo en Scketchup o puedes hacerlo manualmente en el Editor (es un proceso sencillo pero largo, sobre todo si el nivel es grande).
La último que tienes que tener en cuenta son las texturas. Como esto es una prueba tampoco necesitas que el nivel se vea excelente asà que te voy a decir como usar texturas originales de los juegos para que no tengas que añadir las texturas de Scketchup a la rom (es muy posible que el archivo de la textura no sirva directamente y haya que hacerle algunas transformaciones usando otros programas para que sea compatible con el Editor, algo que no es importante ahora ya que quiero que seas capaz de visualizar tu mapa en el Editor primero y luego ya hacer los cambios desde ahÃ).
-Pon todos los archivos OBJ, MTL y los archivos de imagen de tus texturas de Scketchup en una misma carpeta.
-Guarda los archivos de imagen de tus texturas como BMP (usando Paint). No sé si esto es del todo necesario.
-Abre el archivo MTL con el Bloc de Notas y cambia las extensiones de tus archivos de texturas por BMP. Este paso complementa al anterior pero no sé si es totalmente necesario.
-Crea un archivo textures.TXT y escribe lo siguiente (a la izquierda está el código de la textura de GE/PD y a la derecha el nombre de tus texturas usadas en Sketchup)
para GoldenEye
| Code: | 02B8 texturasuelo.bmp (el nombre real de la textura que usas para el suelo)
011F texturapared1.bmp (el nombre real de la textura que usas para las paredes de una de las salas)
011A texturapared2.bmp (el nombre real de la textura que usas para las paredes de la otra sala)
00A1 texturapared3.bmp (el nombre real de la textura que usas para las paredes del pasillo)
0277 texturatecho.bmp (el nombre real de la textura que usas para los techos) |
para PD
| Code: | 02B8 floortexture.bmp (el nombre real de la textura que usas para el suelo)
017D texturapared1.bmp (el nombre real de la textura que usas para las paredes de una de las salas)
024C texturapared2.bmp (el nombre real de la textura que usas para las paredes de la otra sala)
0288 texturapared3.bmp (el nombre real de la textura que usas para las paredes del pasillo)
018D texturatecho.bmp (el nombre real de la textura que usas para los techos) |
Estas texturas las he seleccionado mientras escribÃa el mensaje, pero puedes usar otras texturas cambiando el código en el archivo txt o directamente en el Editor una vez ya tengas el mapa allÃ.
Ahora a estás preparado para ver tu mapa en el Editor y salvarlo. Mira en mis mensajes anteriores que está explicado cómo hacerlo. |
|
| |
|
|
|
|
|
|
|
|
SATURN_81
00 Agent
Joined: 06 Jun 2010
Posts: 423
Location: spain
|
| Posted: Mon May 14, 2012 5:53 pm Post subject: |
|
|
Use goldeneye textures, they just change the color and I have not used any sketchup texture.
on the grouping of polygons with Room1, Room2 not know yet how.
I do not understand that about the triangulation and the cliping nor meaning. indeed what the cliping only be made "GEeditor" or can also be done in any 3D modeling program? I have to re-read the tutorials of Bobeda because you have not already read them because many times I have not been able to get something.
I think later should be the time to ask everything related to textures as the previous concepts very clear I'm interested in them.
now that I use sketchup is a great time to learn since I have no knowledge or even basic on 3D modeling, when you have made some progress with this program proves others recommended here in the forum. my opnion that this staff is great for someone who has no idea about 3D modeling.
by the way as soon as I create an account on mediafire or any other similar, I send the files I think is the best way to look at if I'm wrong about something.
utilize las texturas de goldeneye, solo que les cambie el color y no he utilizado ninguna textura de sketchup.
sobre la agrupacion de poligonos con Room1, Room2, no se todavia como se hace.
no entiendo eso sobre la triangulacion ni el cliping tampoco se que significa. por cierto lo del cliping solo puede hacerse en "GEeditor" o tambien se puede hacer en cualquier programa de modelado 3D ? voy tener que volver a leer los tutoriales de la bobeda pues ya hace tiempo que no los leo debido a que muchas veces no me he sentido capaz de conseguir algo.
creo que mas adelante debera de ser el momento para preguntar todo lo referido a las texturas ya que los conceptos anteriores me interesa tenerlos bien claros.
ahora mismo utilizo sketchup por que me viene de maravilla para aprender ya que no tengo conocimientos ni siquiera basicos sobre modelado 3D , cuando haya avanzado un poco con este programa probare otros recomendados aqui en el foro. mi opnion personal es que esta muy bien para alguien que no tiene ni idea sobre modelado 3D.
por cierto en cuanto me cree una cuenta en mediafire o cualquier otro similar , enviare los archivos creo que es la mejor forma de examinar si me equivoco con algo. |
|
| |
|
|
|
|
|
|
|
|
Sogun
General
Joined: 15 Dec 2010
Posts: 661
Location: Valencia, Spain
|
| Posted: Tue May 15, 2012 3:37 am Post subject: |
|
|
When you edit GE/PD textures it's probably that it won't work with Editor unless you work a little on them (basically, make them BMP with less than 255 colours). That really isn't important now, when you make your own map with custom textures I can explain it to you. What matters is that you succed in editing the MTL and creating the textures.TXT files.
Grouping polygons as Room01, etc is very important. It won't work at all if you can't make it.
About triangulation and clipping. As I said before, clipping is related to collisions. In GE clipping is the 'floor you can walk', if a room doesn't have clipping you can't enter it; and if your level doesn't have any clipping at all you can't place objects or start points in it so you won't be able to play it.
Clipping can be made in any modeler (then save it as a OBJ file) or in Editor (but only recomended for little adjustments).
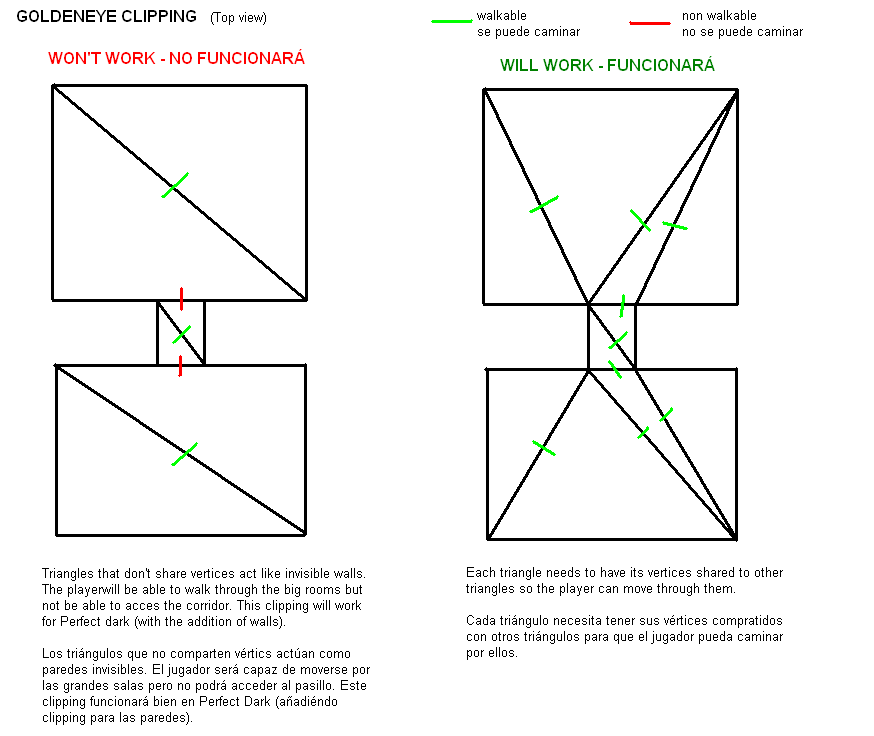
Clipping in GE is tricky, it needs to be perfectly triangulated so the clipping connections can be made correctly. Scketchup should have a feature which lets you see how the model is triangulated, something like this (in Deled):
http://i1185.photobucket.com/albums/z345/Sogunesp/Kakariko_deled_1.png
http://i1185.photobucket.com/albums/z345/Sogunesp/Kakariko_deled_2.png
If you can trigger that, your clipping must look like the right image for GE (in PD it will work both ways, but I recomend like left image):
http://i1185.photobucket.com/albums/z345/Sogunesp/Minituto_clipping_2.png
Tutorials on the vault are great. I learnt a lot from them in the past but sadly they are too Editor related and don't teach about the earlier steps in modelling. Read my long posts, it's all explained there.
---------------------------------------
Cuando modificas las texturas the GE/PD es muy posible que las hayas alterado de tal forma que ya no sean compatibles con el Editor a menos de que trabajes con ellas un poco (básicamente guardarlas como archivos BMP con menos de 255 colores). Pero no te preocupes por eso ahora, cuando hagas tus mapas con tus propias texturas ya te explicaré detenidamente lo que tienes que hacer con las texturas. Ahora lo que importa es que consigas editar el archivo MTL y hacer correctamente el textures.TXT
Agrupar los polÃgonos como Room01, etc es muy importante. Si no lo consigues el Editor no te reconocerá el mapa.
Sobre triangulación y clipping. Como dije antes, el clipping está relacionado con las colisiones. En GE el clipping es 'el suelo que puedes pisar', si una sala no tiene clipping no podrás acceder a ella; y si el nivel no tiene clipping alguno no podrás poner objetos ni el punto de inicio por lo que no será jugable.
El clipping puede hacerse en un programa de modelado y guardarlo como OBJ, o en el Editor (recomendado para hacer pequeños ajustes ya que hacerlo entero desde cero es un proceso muy largo).
El clipping en GE tiene sus complicaciones. Necesita estar perfectamente triangulado para que las conexiones de clipping se hagan correctamente. Scketchup deberÃa tener alguna opción para mostrar cómo está triangulado el modelo, algo como esto (en Deled):
http://i1185.photobucket.com/albums/z345/Sogunesp/Kakariko_deled_1.png
http://i1185.photobucket.com/albums/z345/Sogunesp/Kakariko_deled_2.png
Si puedes activarlo, tu clipping deberÃa ser como el de la imagen de la derecha para que funcione en GE (en PD funcionarÃa de ambos modos, pero mejor hacerlo como en la imagen de la izquierda). Me refiero a esta imagen:
http://i1185.photobucket.com/albums/z345/Sogunesp/Minituto_clipping_2.png
Los tutoriales de GoldenEye Vault son muy buenos. Aprendà mucho con ellos cuando empecé pero se centran mucho en el Editor y apenas dicen nada sobre el modelado del mapa que es lo que te estoy explicando. Léete mis mensajes largos que lo tienes todo explicado en ellos. |
|
| |
|
|
|
|
|
|
|
|
SATURN_81
00 Agent
Joined: 06 Jun 2010
Posts: 423
Location: spain
|
| Posted: Tue May 15, 2012 6:14 am Post subject: |
|
|
I'm reading the tutorial SubDrag and seems well explained, although I have to say that I do not understand is how you make the files Room1, Room2 ect ........ I do not understand both the grouping Room1, Room2.
I think I managed to understand what it means triangulation (for what I'm seeing more or less crudely explained by myself) I think more or less means that a geometrical figure that consists entirely of triangles, for example to make a simply join 2 square triangles that form square or 4 or more triangles.
Yesterday I was reading quite Shogun, s Workshop, you do not know if what you say is read, the truth is that there is a tutorial that is an opinion commentary after another and although not corrected or not, which I I'm messing around with it. I'm trying to go in very small steps to avoid conceptual confusion that I think is the most difficult for me. be clear once the more I think he gains fluency and so I can do the most basic and myself.
estoy leyendo el tutorial de SubDrag y parece bien explicado , aunque tengo que decir que lo que no entiendo es como se hacen los archivos Room1 , Room2 ect........ no entiendo por tanto lo de agrupar Room1, Room2.
creo que he logrado entender lo que significa triangulacion, ( por lo que estoy viendo mas o menos explicado a lo bruto por mi mismo ) mas o menos creo que significa que una figura geometrica este formada en su totalidad de triangulos, por ejemplo para hacer un cuadrado simplemente unir 2 triangulos o bien formar ese cuadrado 4 o mas triangulos.
ayer estuve leyendo bastante Sogun,s Workshop, que no se si es lo que me dices que lea , lo cierto es que no es como un tutorial por que es una opinion comentada tras otra y no se si bien corregida o no , lo cual me estoy liando un poco con ello. estoy intentando ir en muy pequeños pasos para no confundir los conceptos que creo que es lo mas me cuesta. una vez los tenga claros creo que ganare mas soltura y asi lo mas basico podre hacerlo ya por mi mismo. |
|
| |
|
|
|
|
|
|
|
|
Sogun
General
Joined: 15 Dec 2010
Posts: 661
Location: Valencia, Spain
|
| Posted: Tue May 15, 2012 9:01 am Post subject: |
|
|
Subdrag's tutorials help a lot, although they are a little outdated and miss many new features that make the work easier. You have to group the rooms as Room01, Room02... (don't forget the "0"!) in your model program (Scketchup). I don't know about Scketchup but Deled sure has a feature to group tris, so if you can port your level to Deled I could tell you how to do it if you don't figure it out before.
Yeah, that's triangulation. A square is made by at least two tris, and hexagon at least by 4 tris, etc... I think Google Scketchup automatizes this process, but I'm not sure if the final result is very optimized or not.
Keep in mind that for background saving tris is a good thing, but it doesn't work that well with GE clipping. The floor for a squared room made with 2 tris will work for background but probably not for GE clipping. I can't explain it better than with the images I've posted. Perhaps with a video but I don't have enough time now.
Reading this whole post (at least the first pages) can be a good idea BUT I wrote a message that resumed all the process in one of my latest post. It was an edit I made so maybe you missed it. I'll write it again (sorry for English speakers, I'll translate it later in a separate post).
-----------------------------------------------------
Los tutoriales de Subdrag son muy buenos a pesar de que están algo anticuados y no hablan de las nuevas herramientas del Editor que facilitan mucho el trabajo. Tienes que hacer los grupos Room01, Room02, etc... (¡No te olvides del "0"!) en tu programa de modelado (Scketchup) ya que es la única forma de que el Editor reconozca el nivel.
No sé como se hará en Scketup pero en Deled sà que puede hacerse, asà que si puedes pasar tu nivel a ese programa podrÃa decirte como hacerlo si no lo averiguas por ti mismo antes.
SÃ, eso es triangulación. Un cuadrado está hecho de al menos 2 triángulos, un hexágono al menos de 4 triángulos, etc... Creo que Scketchup tiene este proceso automatizado pero no sé si el resultado final está muy optimizado o no. Ten en cuenta que usar cuantos menos triángulos a la hora de hacer el Background (escenario) es una buena idea, pero seguramente no funcionará con el clipping de GE. No puedo explicarlo mejor que con las imágenes que he puesto antes, quizás con un vÃdeo pero no tengo tiempo ahora.
Leer el hilo desde el principio es una buena idea PERO te escribà un mensaje todo el proceso resumido en uno de mis últimos mensajes. Fue un mensaje editado por lo que puede que no lo vieras. Te lo escribo otra vez a continuación:
No me ha quedado tan claro como pensaba, pero espero que te sirva.
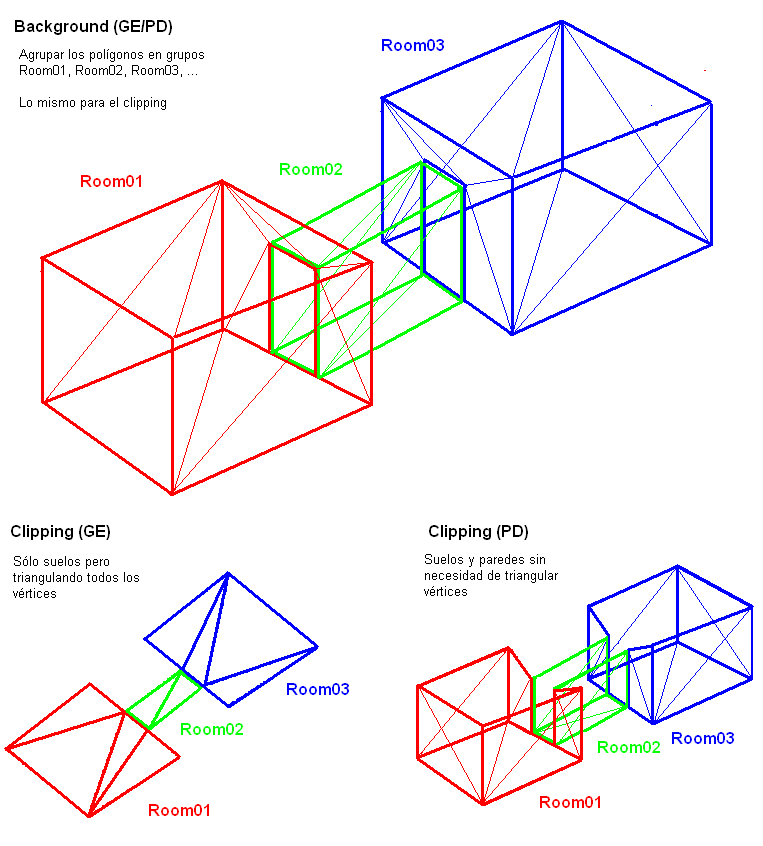
Background es lo que se ve mientras Clipping es lo que hace sólidas las cosas.
El clipping en GE se limita a lo que puedes pisar (suelo, rampas y escaleras) pero tiene que estar perfectamente triangulado (fÃjate que el suelo de Room01 son dos triángulos mientras que en clipping son 4). En PD el clipping basicamente son paredes y suelos invisibles con la posibilidad de ahorrar polÃgonos (el suelo de Room01 vuelven a ser 2 triángulos).
La separación del nivel en diferentes Room sirve para que vaya más fluido, pero si el nivel es muy simple (como éste) podrÃas agruparlo todo como Room01 y funcionarÃa perfectamente. Cuando tienes varias Room necesitas añadir Portals en las zonas que conectan las salas para poder ver de una sala a otra; ésto se puede hacer desde el editor fácilmente.
Para poder cargar tu nivel necesitas texturizar el Background (el clipping lo puedes dejar sin texturizar) y guardar ambas cosas por separado en archivos OBJ (no uses carácteres extraños ni espacios en los nombres de los archivos). Las texturas deben reunir unas caracterÃsticas especiales (ser BMP de menos de 255 colores y con resoluciones no superiores de 64x32 pÃxeles. Puede usar texturas del GE si abres el editor, y abres Tools -> Image tools; clickas con el botón derecho sobre la textura y la guardas, pero fÃjate abajo donde pone 'Preset' y apúntate el número para más tarde). Si estas texturas en bmp no te sirven en tu programa para modelar, guárdalas como PNG que seguro que funcionan asà (conserva los BMP para luego); cuando crees el archivo OBJ se te creará también un archivo MTL que tendrás que editar para usar las texturas correctas (ábrelo con el editor de texto y cambia las extensiones PNG por BMP). Ahora debes de crear un txt en el que escribirás los nombres de las texturas con su extensión, con el código Preset justo antes. Algo asÃ:
| Code: | 007D textura1.bmp
00A5 textura2.bmp
014F textura3.bmp |
Asegúrate de que tienes todos los archivos en una misma carpeta (Background.OBJ, Brackground.MTL, Clipping.OBJ, textures.txt y todas las texturas BMP). Actualiza el editor pulsando en el archivo BetaGrabberTool.exe (espera un poco hasta que te aparezca el mensaje de que se ha actualizado) y abre el Editor mediante el archivo runwaysetupeditor.exe, después File -> New (en GE yo suelo usar Complex con escala 1.0) y después Edit Editor -> Visual Editor (espera un poco hasta que aparezca la nueva ventana).
En la parte de abajo a la izquierda pondrá 'Edit Objects Mode', clicka varias veces hasta que ponga 'Edit Room Positions', luego pulsa con el botón derecho sobre cualquier sitio y selecciona 'Delete all clipping, portals, lights' (esto sirve para que al añadir tu nivel no ocurran cosas raras)
Después busca arriba 'Convert' -> 'Convert obj to... -> convert obj to GE level (if already added textures). Seleccionas tu archivo textures.txt y luego el archivo Background.OBJ.
En la ventana del Visual Editor, pulsa con el botón derecho y selecciona 'Export Full Background File', selecciona el RoomPositions.txt que se habrá creado en tu carpeta gracias al paso anterior (esto contiene la información de tu nivel convertida desde el archivo OBJ para que pueda ser manejada por el Editor). Guarda el archivo bin. Ahora deberÃa de aparecer tu nivel en la ventana sustituyendo al nivel que hubiese antes.
Sobre 'Edit Rooms Positions' clicka hasta que aparezca 'Edit Clipping Mode', pulsa con el botón derecho sobre la ventana y selecciona 'Import clipping from obj files' -> 'Import clipping from obj' y selecciona tu archivo Clipping.OBJ. Si pulsas abajo sobre 'Clipping off' para ponerlo en 'clipping on' deberÃas ver unos polÃgonos, normalmente grises (pero podrÃan ser de cualqueir color) mezclándose con los polÃgonos de tu nivel (sólo en el suelo en caso de GE y suelo y paredes en PD).
Ahora serÃa buena idea guardar tu nivel para que puedas trabajar con él más adelante. File -> Save as project + rooms. Le das un nombre y seleccionas la carpeta donde quieras guardarlo (te recomiendo crear una carpeta nueva para que no se te llene todo de archivos, por ejemplo dentro de la carpeta donde tienes el resto de archivos y llamarla 'project').
Si consigues llegar hasta aquà ya te diré como continuar. PodrÃas crear un nuevo hilo para que no se mezclen los mensajes y asà más gente pueda ayudarte también.
Para crear el archivo textures.TXT quizás te sirva mejor la explicación que puse después:
-Pon todos los archivos OBJ, MTL y los archivos de imagen de tus texturas de Scketchup en una misma carpeta.
-Guarda los archivos de imagen de tus texturas como BMP (usando Paint). No sé si esto es del todo necesario.
-Abre el archivo MTL con el Bloc de Notas y cambia las extensiones de tus archivos de texturas por BMP. Este paso complementa al anterior pero no sé si es totalmente necesario.
-Crea un archivo textures.TXT y escribe lo siguiente (a la izquierda está el código de la textura de GE/PD y a la derecha el nombre de tus texturas usadas en Sketchup)
para GoldenEye
| Code: | 02B8 texturasuelo.bmp (el nombre real de la textura que usas para el suelo)
011F texturapared1.bmp (el nombre real de la textura que usas para las paredes de una de las salas)
011A texturapared2.bmp (el nombre real de la textura que usas para las paredes de la otra sala)
00A1 texturapared3.bmp (el nombre real de la textura que usas para las paredes del pasillo)
0277 texturatecho.bmp (el nombre real de la textura que usas para los techos) |
para PD
| Code: | 02B8 floortexture.bmp (el nombre real de la textura que usas para el suelo)
017D texturapared1.bmp (el nombre real de la textura que usas para las paredes de una de las salas)
024C texturapared2.bmp (el nombre real de la textura que usas para las paredes de la otra sala)
0288 texturapared3.bmp (el nombre real de la textura que usas para las paredes del pasillo)
018D texturatecho.bmp (el nombre real de la textura que usas para los techos) |
Estas texturas las he seleccionado mientras escribÃa el mensaje, pero puedes usar otras texturas cambiando el código en el archivo txt o directamente en el Editor una vez ya tengas el mapa allÃ.
De verdad, está explicado todo paso a paso y lo único que no puedo explicarte es cómo modelar el mapa en Scketchup (aunque te he puesto imágenes de cómo deberÃa quedar el resultado final). Quizás un video podrÃa ayudar más, pero seguirÃamos teniendo el mismo problema.
EDITO: Acabo de descargar Google Sketchup 8 y creo que ya sé como agrupar en Room01, Room02, etc:
-Ver -> Barra de Herramientas -> Capas
-Pulsas en el icono de 'Gestor de capas' y pulsas en el "+" para añadir las capas que necesites (en este caso 3 capas nuevas: Capa 1, Capa 2 y Capa 3)
-Puedes cambiar el nombre a las capas haciendo doble click en el nombre. Ahora cambia los nombres por Room01, Room02 y Room03.
-Selecciona los objetos que quieres agrupar, pulsa con el botón derecho sobre ellos y selecciona "Información de la entidad". Se abrirá una ventanita con una pestaña llamada Capa. Selecciona ahà Room01 o la que corresponda.
Puedes guiarte por la imagen que puse antes para asignar el número a las salas, pero puedes elegir el orden que quieras.
Un saludo. |
|
| |
|
|
|
|
|
|
|
|
SATURN_81
00 Agent
Joined: 06 Jun 2010
Posts: 423
Location: spain
|
| Posted: Tue May 15, 2012 10:06 am Post subject: |
|
|
Shogun good post thank you latter, it seems that you will have taken time. well the only thing is I'm not clear from where the files Room1, Room2 ect. at the end of the map the sketchup create a folder to save the level and leave me alone OBJ files, MLT and textures. thus if the files are not Room1 and Room2 must be created manually.
by the way, you downloaded the SketchUp 8, I wish you luck with it. I think the OBJ exporter is a plugin that does not come with the program, when I think I put the plugin remove an OBJ import now can not remember if it comes with, however I think the free version is made in this way to force you to get the PRO.
thanks for all Shogun
bueno Sogun te agradezco este ultimo post, parece que te habra llevado tiempo. bien lo unico que no me quedo claro es que no se de donde salen los archivos Room1 , Room2 ect. al finalizar el mapa el sketchup cree una carpeta donde guardar el nivel y solo me salen los archivos OBJ, MLT y las texturas. con lo cual no se si los archivos Room1 y Room2 deben de crearse manualmente.
por cierto ya que descargaste el Sketchup 8 , te deseo mucha suerte con el. creo que el exportador OBJ es un plugin que no viene con el programa, cuando meti el plugin creo que quito uno de importacion OBJ que ahora no recuerdo si viene con el, de todas formas creo que la version gratuita esta hecha de esta forma para forzarte a que consigas el PRO.
gracias por todo Sogun |
|
| |
|
|
|
|
|
|
|
|
Sogun
General
Joined: 15 Dec 2010
Posts: 661
Location: Valencia, Spain
|
| Posted: Tue May 15, 2012 10:49 am Post subject: |
|
|
Groups Room01, Room02, Room03, etc are stored inside the OBJ file, they aren't independent files.
Notice that it's NOT Room1, Room2, Room3... you are forgeting the "0", it won't work that way!
I'll search for the OBJ exporter just in case you come up with more trouble, but with Autocad and Deled I can do almost everything.
-----------------------------------------------------------
Los grupos Room01, Room02, Room03, etc se crean dentro del OBJ, no son archivos independientes.
Recuerda que NO es Room1, Room2, Room3... tienes que poner el "0" o no funcionará.
Buscaré el exportador de OBJ para Sketchup por si acaso tienes más problemas y poder ayudarte, pero yo con Autocad y Deled ya me las apaño XD |
|
| |
|
|
|
|
|
|
|
|
Sogun
General
Joined: 15 Dec 2010
Posts: 661
Location: Valencia, Spain
|
| Posted: Fri May 18, 2012 8:35 am Post subject: |
|
|
OK guys, here's the translation for the step-to-step process from creating a map on modeller until saving it in Editor to work with it later.
01. What you need to know before modelling.
Levels are made from different parts, being the most importants Background (the scenario you see) and Clipping (collision; indicates floors you can walk on, walls you can't go through, ladders you can climb, etc...).
If this is your first map I recomend to start with something simple, like two rooms connected by a corridor. In modeller they should look like these (notice that GE and PD clipping are made different):
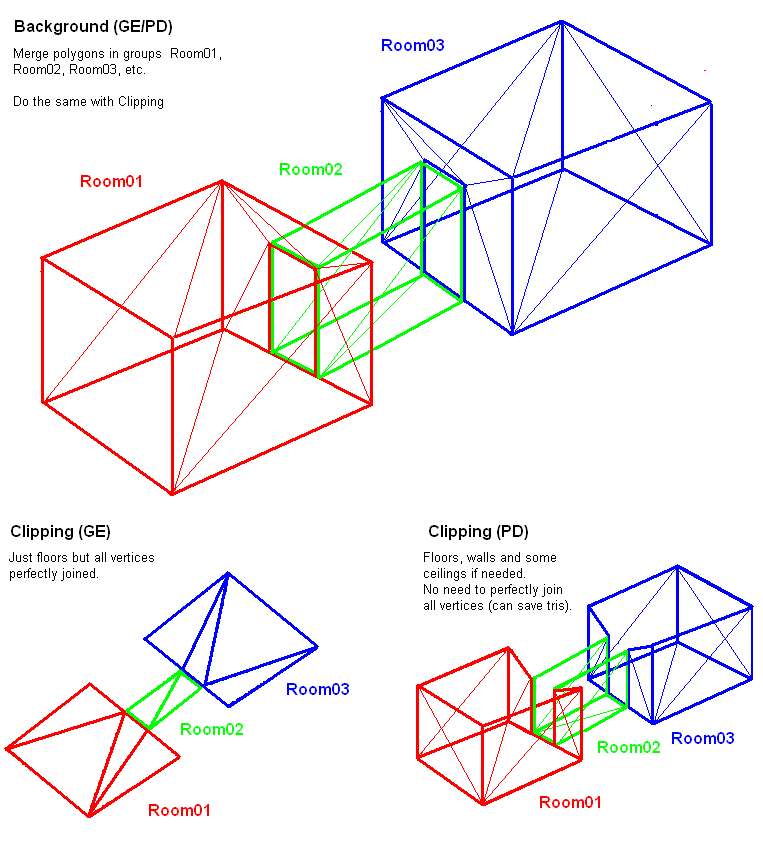
Heh, the drawings aren't as clear as I thought but I hope they help.
Separating the map in groups Room01, Room02, Room03... (in hex -> ...09, 0A, 0B... 0E, 0F, 10, 11...) is made so the level performs better. If it's a small and simple level like this one having just Room01 will work perfectly, but I then you won't be using portals and that's something you can't avoid when creating bigger maps. Portals are needed to connect different rooms. They are like doors/windows that let you see from one room to another and can be done easily in Editor once you have your level there.
-> if your map doesn't have RoomXX groups it won't work on Editor!
In GE and PD each unit has an equivalence of 1cm. If you missed this don't worry as you will be able to rescale the map once in Editor.
You need to texture all your Background in order to see it in Editor (Clipping doesn't need to has textures). Then you have to save Background and Clipping as OBJ files (don't use blank spaces or weird characters in the names of the OBJ files). Textures need to have some special characteristics: be BMP files with less than 255 colours and its size can't be bigger than 64x32 pixels or 64x64 if its greyscaled.
To be sure that you are using the right texture format I'll explain to you how to use original GE/PD textures. Open Editor -> Tools -> Image Tools (wait until a new window pops up) then right click on the texture you want to use and select 'Save as'. Check at the bottom of the window where it says 'Preset' and write down that code because you'll be using it later (something like 02C5, I usually save the texture with this code as its filename so I won't forget it).
Normaly you can't use this files in you modelling tool, resave them as PNG or JPG, but keep the BMP.
Clipping doesn't necessarily need to be made right now, as it can be added to the map once the background has been ported to Editor.
You can even do clipping in Editor instead of using a modelling program, but that way is very time consuming (only recomended for small fixes).
02. After modelling. Preparing the files.
After creating the Background.OBJ file you should see a Background.MTL too. Open that file with Notepad and change the PNG and JPG formats to BMP, then save the file and exit (this will attach the OBJ file with the textures compatible with Editor).
Now you should create a Textures.TXT (which will attach the textures used to the ones in the rom or add custom textures if you were using any). If you are using textures already in the rom, the TXT will have to columns separated by a blank space: left with the 'Preset code' you wrote down earlier and the right column with the name and extension of the texture. It should be something like this
| Code: | 0012 texture1.bmp
03AC texture2.bmp
024F texture3.bmp |
If you are using custom textures your TXT will just have the right column.
Now make sure all your files are in the same folder: Background.OBJ, Background.MTL, Textures.TXT and all the BMP textures you are using.
03. Porting your level to Editor
Before opening Editor be sure to upload it to the last beta. Double click BetaGraverTool.exe, wait until a message pops up and then open the Editor by the RunawaySetupEditor.exe file.
Select File -> New -> select the level you want (I use Complex) and set 'Scale' to 1.
Then go to Edit Setup -> Visual Editor. Wait until a new window appears (it will take a while).
In the down-left corner of the Visual Editor window you'll see the words 'Edit Objects Mode'. Click on them until they change to 'Edit Positions Mode', then right-click on the level and select 'Delete all clipping, portals, lights' (this will prevent weird stuff happening when you add your level later).
Now go to 'Convert' -> 'Convert obj to... -> 'convert obj to GE level (if already added textures)', choose the Textures.TXT file, then Background.OBJ.
Now right-click on the Visual Editor window while in 'Room Positions Mode' and select 'Export Full Background File'. Select the RoomPositions.TXT that was created in the previous step (this TXT and the BIN files created contains your map in GE/PD format). Save the BIN file (wherever you want, the same folder than all your files will work) and then you should be able to see your level in the Visual Editor window!
04. Saving your map in Editor so you can work with it later
File -> Save as project + rooms
Give your level a name and select the folder in which you want to save it. I recomend using a different folder from the one you have been using because lots of new files are going to be created.
You'll need to select a base rom too. As you haven't added/changed any custom textures you should choose an original rom.
05. Working in the level to test it
-> Clipping
First thing you need to do is adding the clipping (or you won't be able to place any object at all).
In Visual Editor go to 'Edit Clipping Mode'. Right click on the level and select 'Import clipping from obj files' -> 'Import clipping from obj', then choose your Clipping.OBJ file.
If your click on the 'clipping off' words to make them 'clipping on' you should be able to see some grey/white polys merged with the background floor.
Do ctrl+H to prevent moving background or clipping from it's positions (that's very annoying).
As this is a very simple map, clipping connections (in GE) should have been done right automatically. We can right-click in 'Edit clippin mode' on the clipping and select 'Redo Clipping connections' to have another guarantee that connections are fine, but even that way we can find some wrong connections and have to fix them manually (perhaps explained in next lesson  ). ).
-> Portals
Remember to do ctrl+H everytime you reopen the project.
Make 'Portals off' to 'Portals on' or you won't see them even if they are created.
Go to 'Edit Portals/BG' mode, right-click and choose 'Autoportal'. That should very accurately create portals in the places where clipping from two different rooms are met. You can move and resize portals with the tools in Visual Editor. Be sure to make portals as close to the room connections as possible if you move them.
If autoportal didn't work as expected, go to 'Clipping mode', select the two clipping tris that should "contain" the portal (hold ctrl and click on each tri), then right-click and select 'Create Portal from two tiles'; that will create a portal that will need some tweaks (rise, resize).
-> Spaw points, guns and stuff
Follow this tutorial on the Vault, it's very well explained there -> http://www.goldeneyevault.com/files/tutorials/multi/geeditorv2quickmultilevel.pdf
-> Injecting the level into the rom and play it
When you have background, clipping, portals and at least spawn points ready you can play the level.
Do Save+Rooms, then File -> Inject project into ROM, select your project and click the 'Inject...' button. Then name a new rom (or it will overwrite your base rom and I don't recomend that) keeping the .ROM extension and save it.
This is the quick way to do it and your level will be placed in the spot of the level you started the project. (I used Complex becuase you don't need to unlock anything to play it, although you should have a 100% completed save but just in case).
There are other ways to inject your project and choose others levels to replace with the 21990 (or 39850) Modifications Menu (and then change fog distance, skies, music and other settings too). But I'll explain that in another post if needed.
Be sure to put the correct settings for your custom rom on emulator or it will have some slowdowns or even don't work at all !! |
|
| |
|
|
|
|
|
|
|
|
EternallyAries
007
Joined: 05 Oct 2009
Posts: 1943
Location: Las Vegas
|
| Posted: Fri May 18, 2012 2:13 pm Post subject: |
|
|
I'm sorry that I am going kinda bit off topic. But I used to use Google Sketchup a long time ago. And I never learn how to import into OBJ format. If I did learn how. I've release a bunch more levels to. Since Google Sketchup uses wonderful mapping tools and it has amazing poly fixer and all that. And it can make amazing goldeneye levels.
_________________
There totally nothing to read here. |
|
| |
|
|
|
|
|
|
|
|
acceptable67
007

Joined: 16 Jan 2010
Posts: 1738
Location: US
|
| Posted: Fri May 18, 2012 3:16 pm Post subject: |
|
|
| EternallyAries wrote: | | I'm sorry that I am going kinda bit off topic. But I used to use Google Sketchup a long time ago. And I never learn how to import into OBJ format. If I did learn how. I've release a bunch more levels to. Since Google Sketchup uses wonderful mapping tools and it has amazing poly fixer and all that. And it can make amazing goldeneye levels. |
You mean export?
Import the exported file into Blender, then export OBJ! 
_________________
| Rare wrote: | | Perfect Dark Forever. |
|
|
| |
|
|
|
|
|
|
|
|
|
|
|
|
|
|
You cannot post new topics in this forum
You cannot reply to topics in this forum
You cannot edit your posts in this forum
You cannot delete your posts in this forum
You cannot vote in polls in this forum
|
|
|
|